
iMovie has no caption button. It can't transcribe your speech, and it can't import a subtitle file such as an SRT. To add captions or subtitles in iMovie, you type each line yourself as a title, iMovie's text tool, and line it up with the speech. That works on a Mac, iPhone and iPad, and it's fine for a few lines. For a whole video, it's faster to finish the edit in iMovie, export it, and burn captions in automatically with a caption generator. Both ways are below.
Does iMovie have automatic captions?
No. iMovie can't write captions from your audio, and Apple's iMovie guides describe only the Titles tool for adding text (Apple Support). It also can't open subtitle files, so an SRT or VTT file from another app won't load. Whatever you see on screen in iMovie is a title you placed by hand.
That leaves two ways to caption a video you edit in iMovie:
- Type the captions as titles in iMovie. Free and built in, but slow: a minute of speech needs about 20 caption lines, each typed, placed and timed by hand.
- Burn captions in after you export. A caption generator writes them from the speech in a few seconds, in a style you choose, and exports a new video.
How to add captions in iMovie on a Mac
- Open your project so the video is in the timeline.
- Click Titles above the browser, in the top-left of the window. The title styles appear.
- Pick a style that sits low in the frame, such as Lower Third. Skim a thumbnail to see whether it moves; a plain, still style is easiest to read as a caption.
- Drag the style into the timeline, above the clip where the first line is spoken. It sits on its own row, above the video.
- Type the line. Double-click the placeholder text in the viewer and type what's said. Use the font controls above the viewer to set the font, size and color, then click Apply.
- Match the timing. Drag the ends of the title bar so it starts when the line is spoken and ends when it finishes. Turn on View → Snapping if you want edges to line up with clips.
- Repeat for every line, then export with File → Share → File.
If you drop a title onto a clip instead of above it, iMovie attaches it to that clip and sets its length for you: the whole clip if you drop it in the middle, or the first or last third if you drop it near an end (Apple Support). Placing titles above the clip gives you more control over timing.
How to add subtitles in iMovie on iPhone or iPad
On iPhone and iPad, each title belongs to one clip, so captions follow the clip's cuts:
- Open your movie project and tap the clip where the first line is spoken. The inspector opens at the bottom.
- Tap the Titles button (the T) and choose a style. Turn on Lower Third placement so the text sits near the bottom of the frame.
- Type the line. Tap the sample title in the viewer, tap Edit, type what's said, then tap Done on the keyboard (Apple Support).
- Make it last the whole clip. Tap the More button in the titles controls and turn on full clip duration.
- Split the clip for the next line. Move the playhead to where the next line starts, tap the clip, tap Actions (the scissors), then Split. Give the new piece its own title.
- Repeat for every line, then tap Done and use the share button to Save Video to Photos.
Splitting a clip for every sentence is the slow part, and it makes later edits harder: move one cut and the captions after it no longer match. On a phone, most people caption the finished video instead.
How to add automatic captions to an iMovie video
The faster way is to do all your editing in iMovie first, export the finished video, then add captions to that file. With AutoSubtitles, the captions are written from your speech automatically and burned into the video. It runs in your browser on a Mac or in Safari on an iPhone, with no account and nothing to install.
On a Mac:
- Export from iMovie. Choose File → Share → File, pick a resolution and save the video.
- Open autosubtitles.com in Safari, Chrome or Edge and click New Video. Choose the file you just exported and pick its language, or leave it on Auto Detect. Your video stays on your Mac; only the audio is sent for transcription.
- Check the captions. They appear a few seconds later, line by line, already timed to the speech. Click any line to fix a word or adjust its timing.
- Choose how they look. Open Styles and pick one of 28 caption styles, from plain white subtitles to bold word-by-word highlighting, then adjust the font, colors, size and position.
- Export the video with the captions burned in.
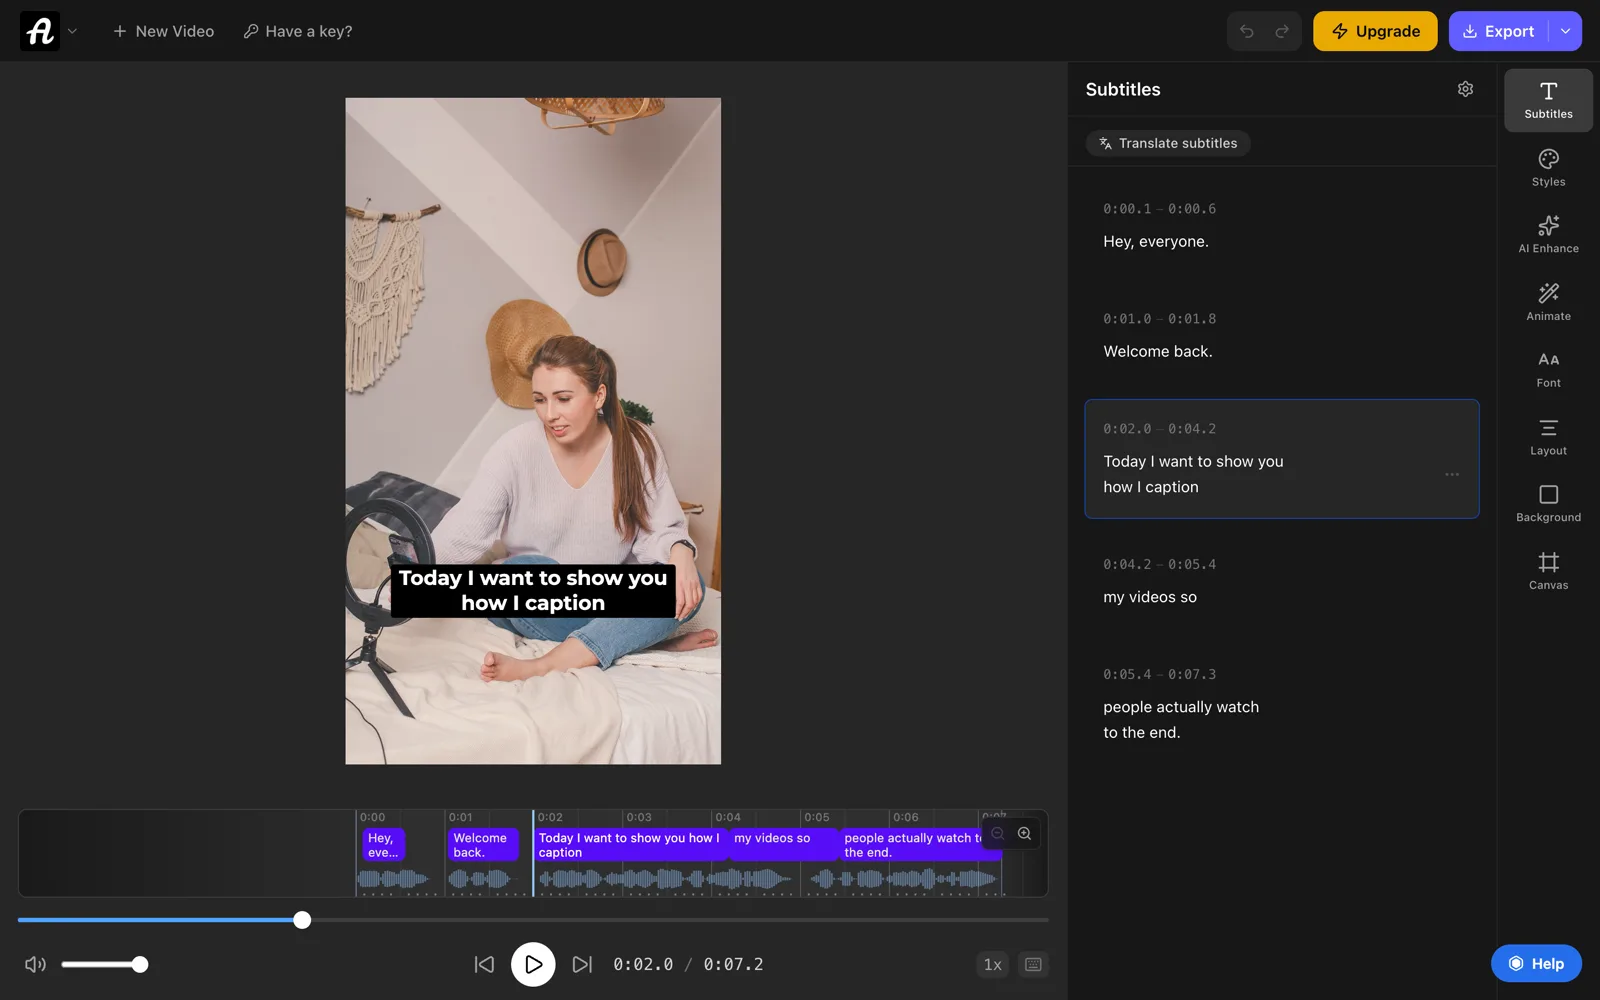
On an iPhone:
- Save your movie from iMovie. Tap Done, tap the share button, then Save Video.
- Open autosubtitles.com in Safari and tap + to import the video from your photos.
- Check the captions and pick a style, the same as on a computer.
- Export, then tap Save to Photos. The captioned video lands in your camera roll, ready to post or to bring back into iMovie.
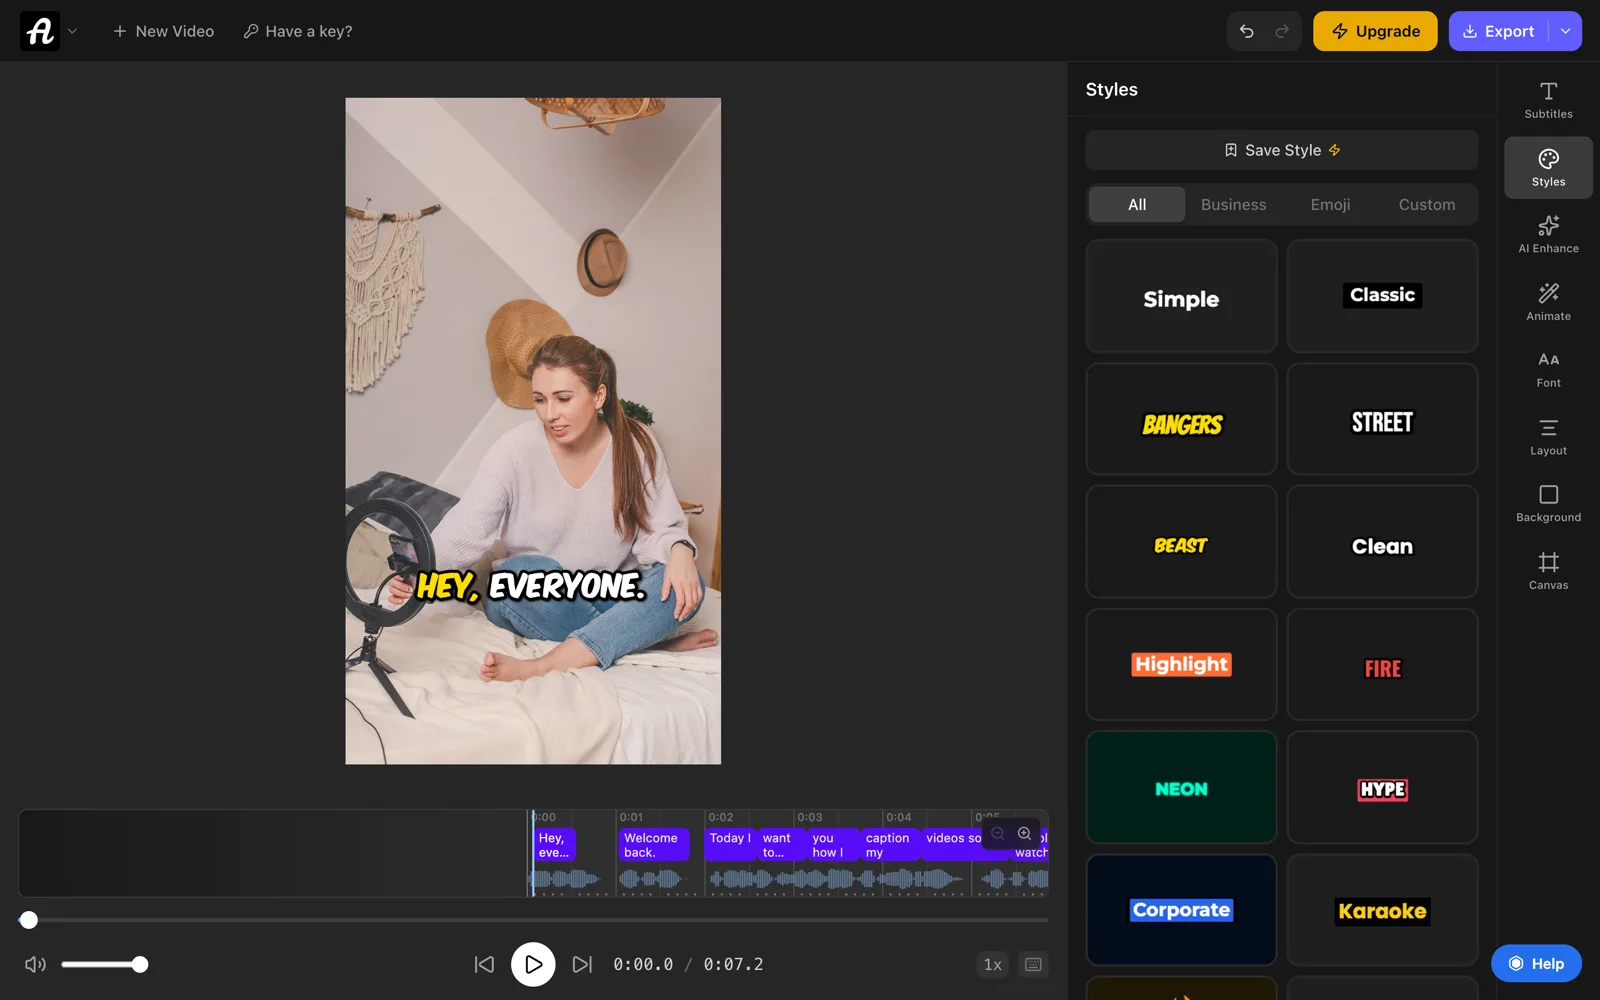
Caption last. Burned-in captions are part of the picture, so any cut you make afterwards in iMovie cuts the captions with it, and you can't reword them there. Finish the edit first.
The free plan includes every caption style and animation and handles videos up to 10 minutes long. Free exports are up to 720p with a small AutoSubtitles watermark. Pro ($9/month) removes the watermark, exports in HD and 4K, and adds SRT and VTT subtitle files for YouTube and Vimeo.
iMovie titles vs burned-in auto captions
| iMovie titles | Auto captions, burned in |
|---|---|
| You type every line | Written from your speech in seconds |
| You time every line by dragging | Timed to the speech, word by word |
| Title styles made for headings and names | 28 caption styles, with word highlighting and animation |
| Free, built into iMovie | Free up to 10 minutes, with a small watermark |
| Best for a few words on screen | Best for captioning everything that's said |
Both give you open captions: text drawn into the picture that every viewer sees, on every app you post to. Neither gives viewers a CC button to switch them off. For that you need a separate subtitle file; see open captions vs closed captions for the difference.
Tips for captions in iMovie
- Keep each title short. One line of about 5 to 8 words reads at a glance; split longer sentences into two titles.
- Use one style and size for every line, so captions don't jump around between clips.
- Keep text clear of the bottom edge. On TikTok, Reels and Shorts, the app's buttons and description cover the lower part of the frame, so captions placed there get hidden.
- Use white or yellow text with an outline or shadow. It stays readable over bright and busy footage.
- Watch the whole video once at the end with the sound off. Any line that's on screen too briefly to read needs a longer title.
Frequently asked questions
Does iMovie have automatic subtitles?
No. iMovie can't transcribe speech or generate captions. You can type captions by hand with titles, or export the video and add automatic captions with a caption generator such as AutoSubtitles, which writes them from the speech and burns them in.
Can I import an SRT file into iMovie?
No. iMovie doesn't open SRT, VTT or other subtitle files. To get the text of an SRT onto your video, burn it in with a tool that reads subtitle files, or generate new captions from the video's speech and export the video with them burned in.
How do I add captions to a video in iMovie on my iPhone?
Tap the clip, tap the Titles button, choose a style and type the line. Each title covers one clip, so split the clip (Actions, then Split) wherever the next line starts. For a long video, save it from iMovie and add automatic captions at autosubtitles.com in Safari instead.
How do I add subtitles to a video on a Mac?
In iMovie, add a title above the clip for each line and type the words. To do it automatically, open autosubtitles.com in Safari or Chrome, choose the video, check the captions it writes and export the video with them burned in.
How do I add text to a video in iMovie?
Click Titles above the browser on a Mac, or tap the clip and then the Titles button on iPhone or iPad, choose a style and type your text. The same titles work for a heading, a name on screen or captions.
Can I add closed captions in iMovie?
No. Closed captions are a separate track viewers can turn on or off, and iMovie can't make one. Titles in iMovie are open captions: burned into the picture and always on. For closed captions on YouTube or Vimeo, upload an SRT or VTT file next to the video instead.
How long does it take to caption a video in iMovie by hand?
A minute of speech is usually about 20 caption lines, and each one has to be typed, placed and timed. A five-minute video can take an hour or more. Automatic captions take a few seconds, plus a few minutes to fix words that came out wrong.
Can I add captions in iMovie for free?
Yes. Titles are free in iMovie. Automatic captions with AutoSubtitles are free for videos up to 10 minutes, with exports up to 720p and a small watermark; Pro ($9/month) removes the watermark.