
DaVinci Resolve has three ways to add subtitles: type them on a subtitle track, import an SRT file, or let Resolve write them from the audio with Create Subtitles from Audio. The first two work in the free version. The automatic one is part of DaVinci Resolve Studio, the paid version ($295, one-time). If you use free Resolve and don't want to type every line, get an SRT file from a caption generator and import it, or finish your edit and burn styled captions in after export. All of these are below, with the export settings that make subtitles actually show up in your video.
Does DaVinci Resolve have automatic subtitles?
Yes, but only in Studio. Studio transcribes your timeline's speech and builds a subtitle track for you. The free version has the same subtitle track, styles and export options, but no transcription, so you either type the subtitles or bring them in as a file.
That gives free Resolve users three options:
- Type the subtitles by hand. Built in and free, but slow: a minute of speech is about 20 subtitle lines, each typed and timed.
- Import an SRT file. Get the subtitles written from the speech somewhere else, then import them and style them in Resolve. The quickest free-version route.
- Burn captions in after export. Finish the edit, export, and add animated captions in a caption generator. Best for TikTok, Reels and Shorts, where you want bold styles Resolve's subtitle track can't do.
How to add subtitles manually in DaVinci Resolve
- Open the Edit page with your timeline loaded.
- Add a subtitle track. Right-click in the empty track header area above your video tracks and choose Add Subtitle Track. A track called Subtitle 1 appears above the video.
- Place the playhead where the first line is spoken.
- Add a subtitle. Right-click the subtitle track and choose Add Subtitle. You can also drag Subtitle from Effects → Titles → Subtitles onto the track.
- Type the line. Select the subtitle clip, open the Inspector at the top right, and type the words in the Caption tab.
- Match the timing. Drag the ends of the clip on the timeline so it starts and ends with the speech.
- Add the next line. Click Add New in the Inspector, or repeat step 4, and keep going to the end of the video.
Each subtitle is a clip, so you can move, trim and ripple it like any other clip. You can also add more subtitle tracks, one per language, and turn each one on or off from its track header.
How to import an SRT file into DaVinci Resolve
Resolve imports SRT files in both the free and Studio versions, along with TTML, XML and the subtitles embedded in MXF and IMF files (Blackmagic Design).
- Import the file. Choose File → Import → Subtitle, or right-click an empty part of the Media Pool and choose Import Subtitle, then pick your
.srtfile. - Put it on the timeline. Drag the subtitle file from the Media Pool onto the timeline, lined up with the start of the video. Resolve creates a subtitle track and lays out every line at its time.
- Check the sync. Play a few lines at the start, middle and end. If every line is early or late by the same amount, select all the subtitle clips and move them together.
- Style the track (see below), then render.
An SRT file only stores words and timings, so the subtitles come in plain and take the track's style. If a word is wrong, fix it in the Inspector's Caption tab, the same as a subtitle you typed.
How to get an SRT file without Resolve Studio
Here are three ways to get a timed SRT for free Resolve, from fastest to slowest:
From the video's speech, with AutoSubtitles. Render a quick export of your timeline from the Deliver page (a small 720p file is fine), open autosubtitles.com and click New Video. Your video stays on your computer; only the audio is sent for transcription. The subtitles appear a few seconds later, timed to the speech. Fix any word by clicking its line, then click the arrow next to Export and choose .srt. Subtitle file downloads are part of Pro ($9/month). Import the file into Resolve as above, and its timings match your timeline as long as you don't cut it again.
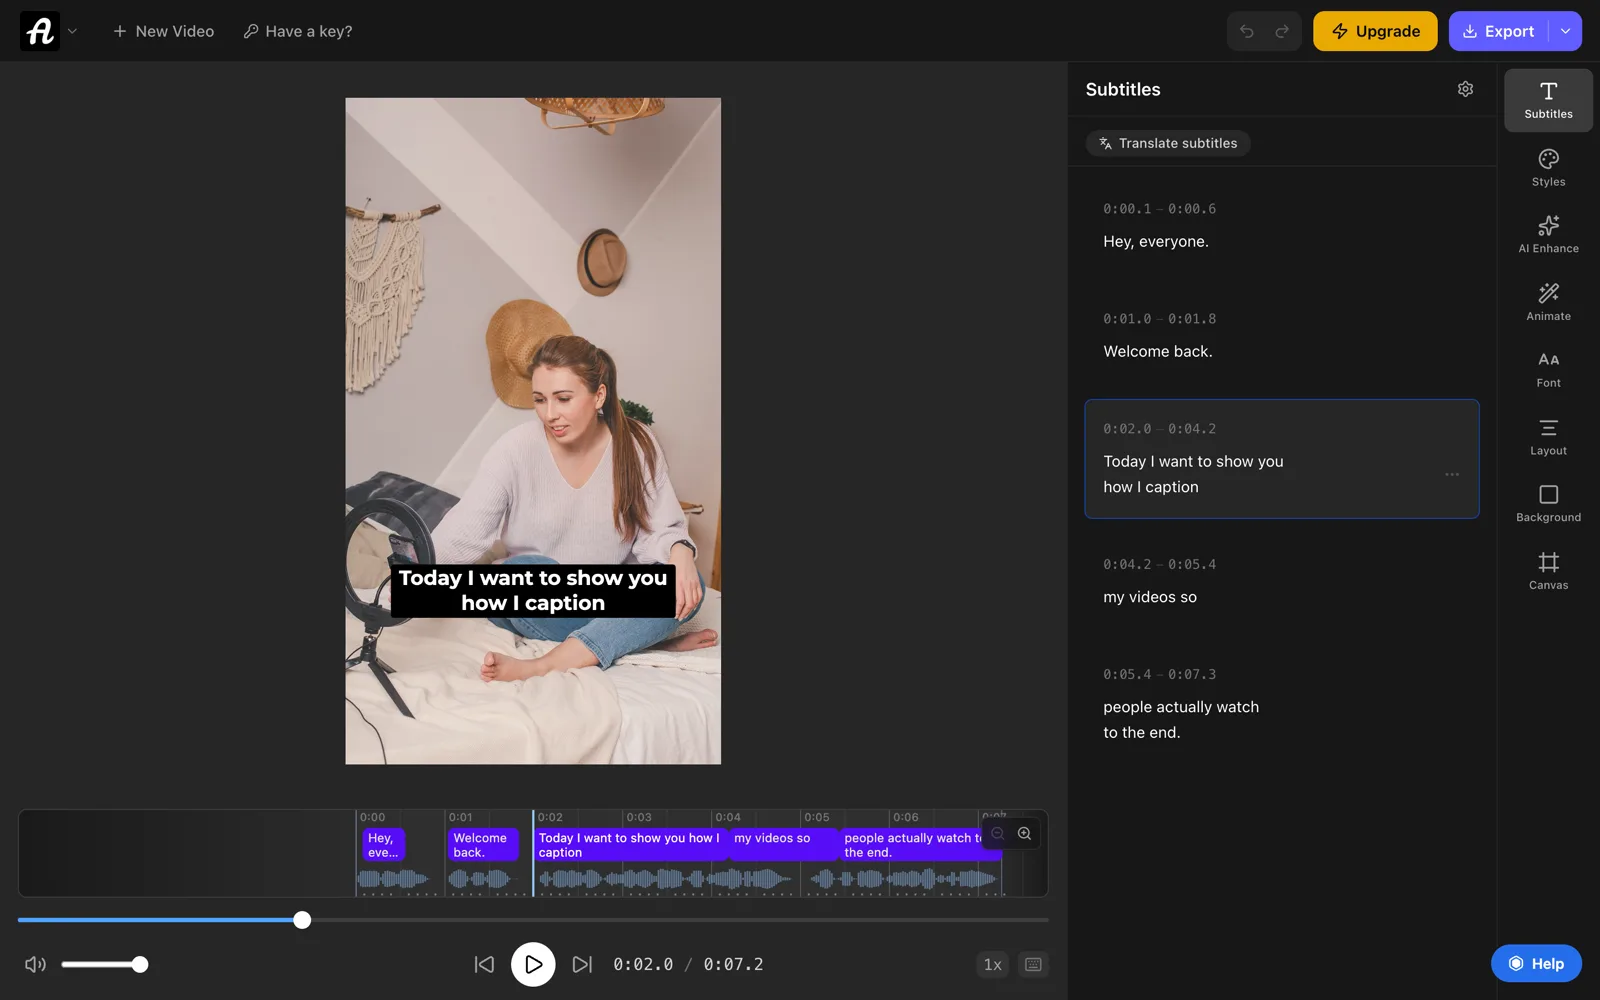
From YouTube's automatic captions. Upload the export to YouTube as an unlisted video and wait for its automatic captions. Then download them from YouTube Studio → Subtitles. If you end up with an .sbv or .vtt file, our free subtitle converter turns it into an SRT in your browser. This is free but slower, and you'll want to read through the captions for mistakes before importing them.
From a script. If the words are already written down, paste them into the free TXT to SRT converter. It splits the text into subtitle lines and estimates their timings, which you then nudge into place on Resolve's timeline.
How to create subtitles automatically in DaVinci Resolve Studio
- Open your timeline on the Edit page.
- Choose Timeline → AI Tools → Create Subtitles from Audio. In older versions it's directly in the Timeline menu.
- Pick the settings: the spoken language, a caption preset, the maximum characters per line (42 is the default; use fewer for vertical video) and one or two lines.
- Click Create. Resolve transcribes the audio and adds a subtitle track above your video.
- Read every line and fix wrong words in the Inspector. Names, brands and quiet speech are where transcription slips most.
How to style subtitles in DaVinci Resolve
Select the subtitle track header or any subtitle clip, open the Inspector and click the Track tab. Changes there apply to every subtitle on the track:
- Font, size and color. A plain sans-serif reads best at small sizes.
- Stroke and drop shadow, so white text stays readable over bright shots.
- Background, a box behind the text, the classic TV caption look.
- Position, to move subtitles up or down the frame.
To style one subtitle differently, select it and change its settings in the Caption tab instead of the track's.
A subtitle track has one plain style: text, outline, shadow and box. Bold, animated, word-by-word captions like the ones on TikTok and Reels aren't part of it. In Resolve you'd build them by hand as titles in Fusion. Burning them in after export is much quicker.
How to export subtitles from DaVinci Resolve
Subtitles that look right on the timeline are often missing from the rendered file, because Resolve doesn't include them by default. On the Deliver page:
- Open the render settings and scroll down to Subtitle Settings.
- Tick Export Subtitle.
- Choose how:
- Burn into video draws the subtitles into the picture. Use it for TikTok, Reels, Shorts and anywhere else that can't load a subtitle file.
- As a separate file saves an SRT or VTT file next to the video, for YouTube, Vimeo or your own player.
- As embedded captions stores them inside the video file, for formats and players that support it.
- Click Add to Render Queue, then Render All.
Burned-in subtitles are open captions: everyone sees them and they can't be turned off. A separate file gives viewers a CC button instead. Our guide on open captions vs closed captions explains when to use each.
How to add animated captions to a DaVinci Resolve video
For short-form video, the faster route is to finish your edit in Resolve, render it, and caption the finished file with AutoSubtitles. It runs in Chrome, Edge or Safari, with no account and nothing to install.
- Render your video from the Deliver page, without subtitles.
- Open autosubtitles.com, click New Video and choose the file. Pick its language, or leave it on Auto Detect.
- Check the captions. They're written from the speech and timed word by word. Click any line to fix it.
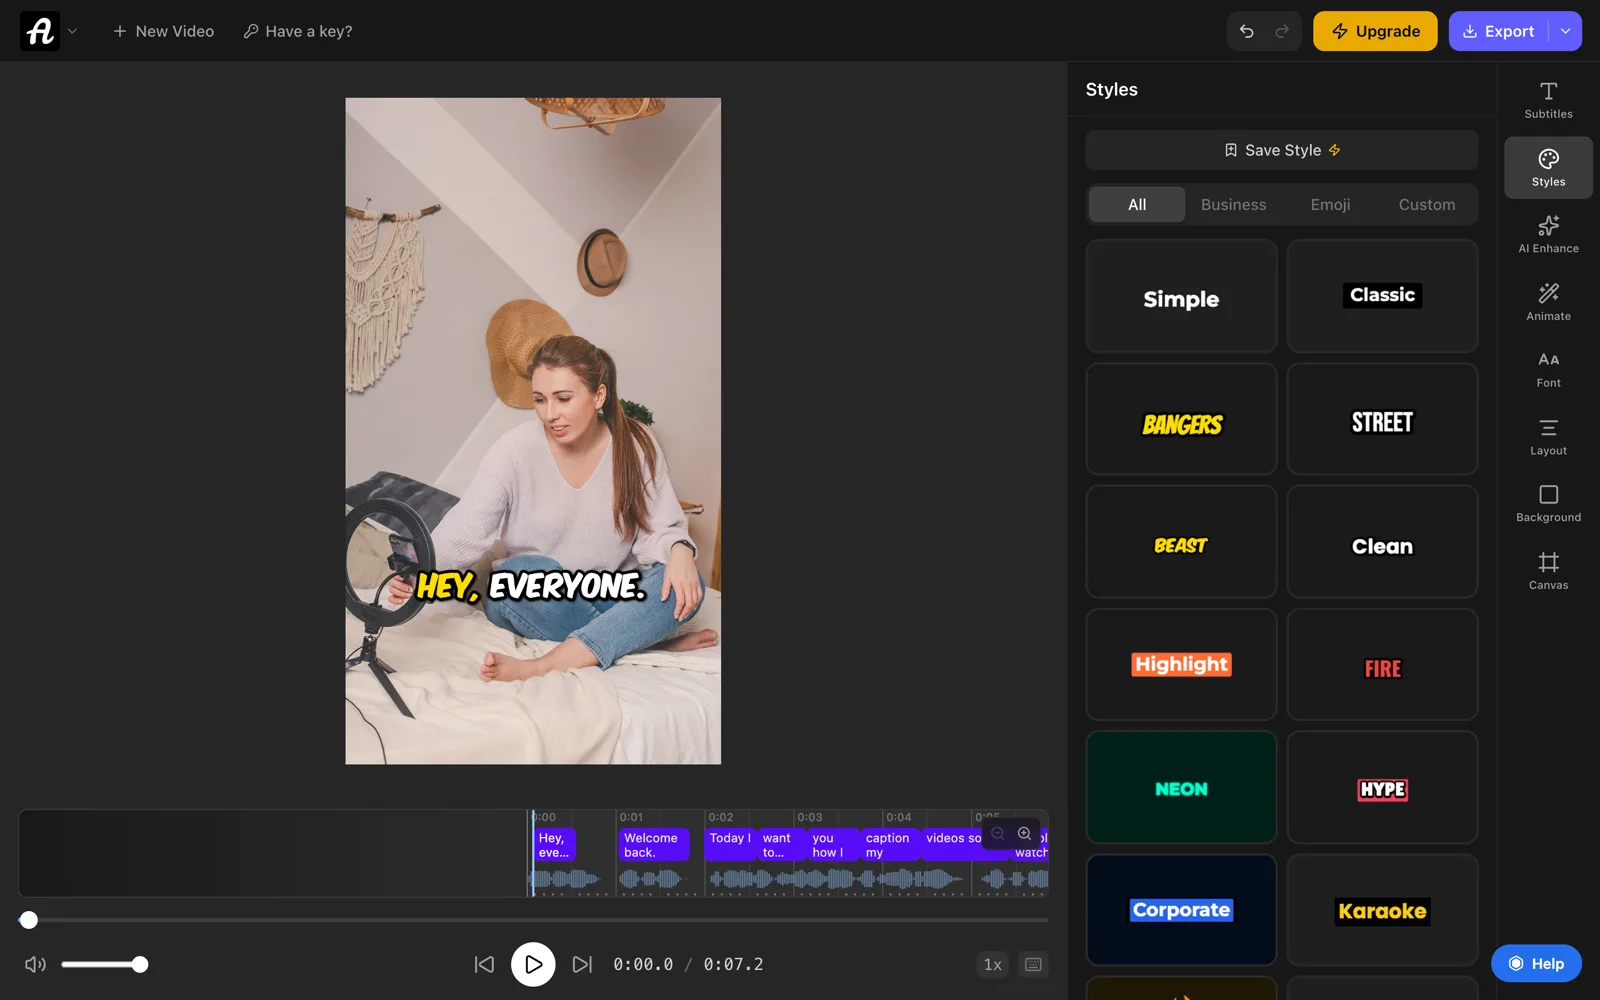
- Pick a style. Open Styles and choose one of 28 caption styles, from plain subtitles to bold word-by-word highlighting, then adjust the font, colors, size and position.
- Export the video with the captions burned in.
Caption last. Burned-in captions are part of the picture, so a cut you make afterwards in Resolve cuts the captions with it. Finish the edit first.
The free plan includes every caption style and animation and handles videos up to 10 minutes long. Free exports are up to 720p with a small AutoSubtitles watermark. Pro ($9/month) removes the watermark, exports in HD and 4K, and adds SRT and VTT downloads for importing into Resolve.
Which way should you use?
| If you… | Do this |
|---|---|
| Have Resolve Studio | Create Subtitles from Audio, then fix and style the track |
| Use free Resolve and want to keep editing | Import an SRT made from the speech, then style the track |
| Need only a few lines on screen | Type them on a subtitle track |
| Post on TikTok, Reels or Shorts | Render, then burn in animated captions |
| Upload to YouTube or Vimeo | Export subtitles as a separate SRT file |
Common problems with subtitles in DaVinci Resolve
- The subtitles don't appear in the exported video. Export Subtitle is unticked in the Deliver page's Subtitle Settings. Tick it, choose Burn into video, and render again.
- The subtitle track is hidden. Check that the track's toggle in the timeline header is on; a hidden track doesn't show or render.
- Every line is out of sync by the same amount. The SRT was made from a different cut, or it was dropped at the wrong spot. Select all the subtitle clips and slide them together, or make a new SRT from your final export.
- Lines drift further out of sync as the video goes on. The SRT was made from a video at a different frame rate or speed. Make it again from the export of this timeline.
- Accents or symbols show as strange characters. The SRT wasn't saved as UTF-8. Open it in our subtitle editor and save it again.
Frequently asked questions
Does the free version of DaVinci Resolve have automatic subtitles?
No. Create Subtitles from Audio is part of DaVinci Resolve Studio, the $295 paid version. In free Resolve you can type subtitles on a subtitle track or import an SRT file, so the quickest free-version route is to get an SRT made from the speech and import it.
Is there a free automatic subtitle generator for DaVinci Resolve?
Yes, outside Resolve. AutoSubtitles writes subtitles from your video's speech for free, and you can export the video with them burned in (up to 10 minutes, with a small watermark). Downloading them as an SRT to import into Resolve is part of Pro. YouTube's automatic captions are another free source, and community plugins add transcription to Resolve itself but take some setup.
How do I add captions manually in DaVinci Resolve?
On the Edit page, right-click above the video tracks and choose Add Subtitle Track. Put the playhead where the line starts, right-click the subtitle track, choose Add Subtitle, and type the words in the Inspector's Caption tab. Drag the clip's ends to match the speech.
How do I import an SRT file into DaVinci Resolve?
Choose File → Import → Subtitle, or right-click in the Media Pool and choose Import Subtitle. Then drag the file from the Media Pool onto the timeline at the start of the video. Resolve makes a subtitle track with every line at its time.
How do I render subtitles in DaVinci Resolve?
On the Deliver page, scroll to Subtitle Settings, tick Export Subtitle and choose Burn into video to draw them into the picture, or As a separate file to save an SRT or VTT file. Then add the job to the render queue and render.
How do I move subtitles in DaVinci Resolve?
To change where they sit in the frame, select the subtitle track, open the Inspector's Track tab and change the position. To change when a subtitle appears, drag its clip along the subtitle track, or drag its ends to change how long it stays on screen.
What is the best font for subtitles in DaVinci Resolve?
A plain, wide sans-serif such as Arial, Helvetica or Roboto, in white with a black outline, shadow or background box. Avoid thin or decorative fonts: subtitles are read in a second or two, often on a phone.
Can DaVinci Resolve make animated, word-by-word captions?
Not on a subtitle track, which has one plain style. You can build animated captions by hand as Fusion titles, but it's slow for a whole video. The quicker way is to render the video and burn in a word-by-word caption style with a caption generator.